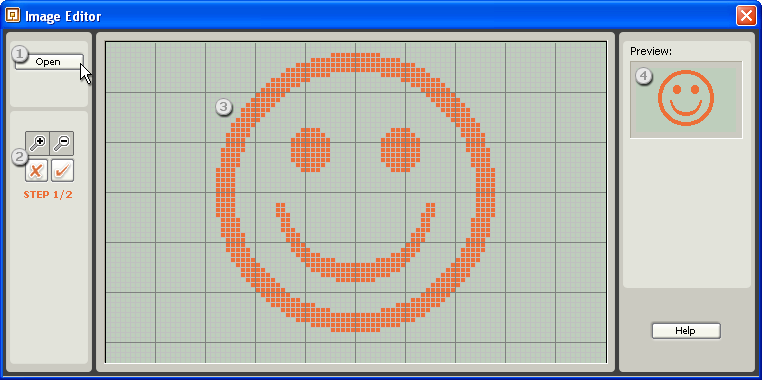
The Image Editor allows you to create your own image and text and then display it on your NXTs display screen. You can also edit existing image files.
The editing screen displays the exact number of pixels featured on the NXT display: 100 pixels wide by 64 pixels high. The Image Editor opens four types of formats: .ric, .jpg, .png, and .bmp.
Table of Contents:
What you need to do
The editing process has 3 steps:
- Click on Open to select and import an existing image file from your computer or use the tool palette to begin creating your own image from scratch.
- Edit the image using the tool palette to the left of the editing screen.
- Save the file on your computer.
Importing an image file

- 1. Choose an image to edit by browsing through your computer. By default, the program opens the Image folder in the LEGO® MINDSTORMS® Software.
- 2a. Crop the section of the image you want to use by zooming in and out and pan the image by clicking and dragging it.
- 2b. Set the level of detail you want displayed using the threshold slider.
- 3. The editing screen features the same number of pixels as the NXT display screen, so any image you edit or create will always fit the display on the NXT.
- 4. The Preview window will let you see your image exactly as it will be shown on the NXT display.
Editing an image

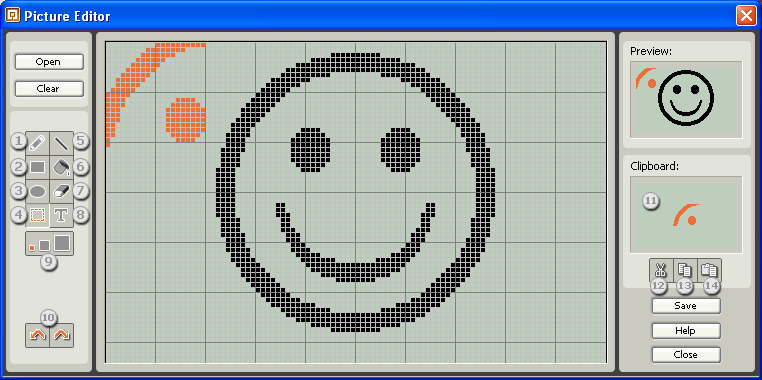
- Draw freehand
- Draw rectangles
- Draw ellipses
- Make selection
- Draw straight lines
- Fill in
- Erase parts of the image
- Type text
- Choose line thickness
- Undo or redo editing steps
- The clipboard shows the image selected from the editing screen.
- Use Cut to remove part of an image from the editing screen and place it onto the clipboard.
- Use Copy to place the image selected onto the clipboard.
- Use Paste to Editing Screen button to paste the image from the clipboard to the editing screen. And then click on the pasted image and drag it to the position you want. Note: Pasted images can be moved when they are orange. Once they change to black, they cannot be moved around the editing screen.
![]()
TIP: How to save in other formats
The NXT software automatically saves all images using the .ric extension. To save an image file in another format, manually change the extension using .jpg or .png after the file name. For example, if the image file is saved as "smile.ric", simply change the .ric extension to "smile.jpg" or "smile.png" and click Save to change the format.