You can use this block to play a sound file or a single tone. To compose a melody of tones, arrange several sound blocks in a row with each set to play different tones.
If you select "Wait for completion" in the configuration panel, the sound file or tone will finish playing before the program moves on to the next block. With this item unchecked, the sound file or tone will continue to play while the next block of your program proceeds.
Choosing "Repeat" will cause a sound file to play again and again.

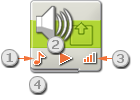
- This icon shows whether the block will play a sound file or a tone.
- This icon shows whether the block will start or stop playing a sound.
- This icon shows the block’s volume. An icon with four orange bars is set to the loudest volume.
- You can drag data wires from other blocks to this block’s data hub that will affect the Sound block’s properties. (See the Data Hub section below for more information.)
Configuring the Sound Block


- The Action property radio buttons let you choose to play a sound file or a tone that you’ll compose.
- Choose to play or stop playing a sound file or tone.
- Set the volume using the slider. Use the text field to type in an exact value.
If you choose to play a sound file (as in the first configuration panel above), you’ll be able to set the following additional properties:
- The Function property will let you set the sound file to repeat so that it plays again and again without stopping. The "Wait for completion" option will be grayed out and no longer available.
- The File property will let you choose the sound file by its name. You’ll see an alphabetical list of available sounds. These are stored in the Sound Files folder of the LEGO MINDSTORMS software on your hard drive. Click on each name to hear it played.
- If you check the "Wait for Completion" checkbox, the sound file will play to its end before allowing the program to move on the next block. With the box unchecked, the sound file will play while the next block in the program proceeds. If the next block is another Sound block, the first Sound file will stop automatically and the new Sound file will play.
If you choose to play a tone (as in the second configuration panel above), you’ll be able to set the following additional properties:
- The Node property will allow you to compose a tone to play when the Sound block is activated. The small keyboard represents three octaves of the musical scale. The text field above the keyboard will display the note that is either pressed on this keyboard with your mouse or typed in using your computer’s keyboard. The input box next to the stopwatch is for specifying the duration of the note in 1/10s of a second.
- If you check the "Wait for Completion" checkbox, your tone will play to its end before allowing your program to move on the next block in your program. With the box unchecked, your tone will play while the next block of your program proceeds.
Configuring the Sound block’s Data Hub
You can control the Sound block dynamically by connecting data wires (from other blocks’ data hubs) to the Sound block’s data hub.
Open a block’s data hub by clicking the tab at the lower left edge of the block after it has been placed on the work area.

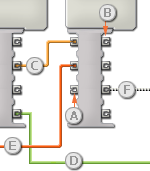
Data wires carrying input information to a block are connected to the plugs on the left side of its data hub. Data wires carrying output information are connected to the plugs on the right side.

[A] Input plug
[B] Output plug
[C] Number data wire (yellow)
[D] Logic data wire (green)
[E] Text data wire (orange)
[F] Broken data wire (gray)
Passing data from the input plug to the output plug
If an input plug has a corresponding output plug (see A above), the input data will pass through from the input plug to the output plug without being changed. In this case, you can only use the output plug if the input plug is connected to an input data wire; connecting an output data wire to such an output plug without a connected input data wire will cause the output data wire to be "broken" (and colored gray).
Data wires carry specific types of data
Each data wire carries a specific type of data between blocks. For example, if a data wire is dragged from a logic plug on a block’s data hub, it can only be connected to a logic plug on another block’s data hub. The chart below shows what kind of data each plug can accept or send out.
Data wire colors
Data wires are identified with specific colors: wires carrying number data are colored yellow, wires carrying logic data are colored green, and wires carrying text data are colored orange.
"Broken" data wires
If you try to connect a data wire to a plug of the wrong data type, the data wire will be broken (and colored gray). You will not be able to download your program if a data wire is broken.
If you click a broken wire you can read why it is broken in the small help window in the lower right corner of the work area.
Data must be within the possible range of the plug
If an input data wire transmits a value outside the possible range of the plug it is connected to, the block will either ignore the value or change it to a value within its range. For plugs that allow just a few input values (example: just 0, 1, or 2), the plug will ignore the input if a value arrives outside its range.
For plugs that accept larger input ranges (example: 0 – 100), the plug will force any input outside its range to fit. For example, if a Move block’s Power plug receives an input value of 150, the block will change the input value to 100 (i.e., a number within the Power plug’s range).
This chart shows the different characteristics of the plugs on the Sound block’s data hub:
| Plug | Data Type | Possible Range | What the Values Mean | This Plug is Ignored When... | |
| Action | Number | 0 - 1 | 0 = Sound file, 1 = Tone | ||
| Filename | Text | 15 character maximum | Filename of sound file to play | Action = Tone | |
| Tone Frequency | Number | 0 - 65535 | Tone frequency in Hertz. The NXTs internal speaker can play back frequencies between approximately 264 and 4000 Hertz. | Action = Sound file | |
| Control | Number | 0 - 1 | 0 = Play, 1 = Stop | ||
| Volume | Number | 0 - 100 | Sound volume. Special note: there are really only 5 sound levels (0, 25, 50, 75, and 100); numbers in between are rounded downwards. | Action = Sound file | |
| Duration | Number | 0 - 65535 | Tone duration in milliseconds | Action = Sound file |